life is always about the journey...

Saturday, November 30, 2013

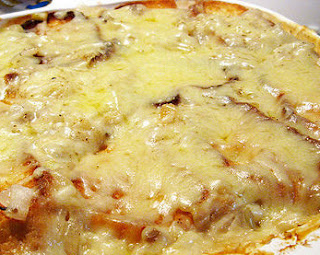
Love French Onion Soup?

Then you'd love this French Onion Bake!  
It has quickly become a family favorite of ours and I've made it three times already.  I have doctored up the original recipe a bit from what I originally pinned because that's how I roll when I cook :)


But its super easy to put together and lemme tell ya it tastes even better the next day. 
If you make it a day ahead of your event or dinner do NOT put the bread or last layer of cheese on it....leave that off until you are ready to bake. You don't want soggy bread...yucky.


Ingredients:

- 3-4 lg/med yellow onions
- 3-4 TBS butter
- 2 cloves of diced/crushed garlic
-a splash of red wine or sherry (optional)
- 1 can of Cream of Chicken Soup
- 1 bag of shredded Swiss Cheese
- 2/3 cup milk
- 3 TBS Worcestershire Sauce
-1 TBS Soy Sauce
- Salt & Pepper to taste
- Sliced French Bread Slices


Instructions:

-Preheat oven to 350 degrees
- Slice onions thinly and sautee in pan with butter till onions are clear...slightly brown is fine too
-In sauce pan heat up milk, soup, Worcestershire Sauce, Soy Sauce, and salt/pepper till heated and mixed well.
-In square or oval baking/casserole pan add your cooked onions in an even layer
-Then pour your heated soup mixture over the onions
-Add half a bag of shredded Swiss Cheese over the onions
-Take your bread slices and lay over your mixture
-Cook at 350 degs for 15 mins uncovered to toast the bread
-After that pull out & flip over your bread & add rest of cheese to top of bread
-Cook for 15-20 minutes more or until cheese and sauce is warm & bubbly

(if you make ahead and refrigerate make sure to set out until its room temperature before cooking)

Its so good I want some more right now :)
Let me know if you try it and love it!


Share:

Thursday, November 28, 2013

Happy Thanksgiving & Dining Room Makeover!


Wishing you all a wonderful Thanksgiving today and a fabulous weekend filled with shopping, eating, resting and laughing with friends & family!

I have finished "most" of my dining room makeover.  If you recall it was very red...I love red..but after 7 years I needed lighter & brighter.  Still a bit Rustic-French Country but just a lighter version.  We still have to hang the new chandelier but that didn't get done in time for Thanksgiving..oh well.  But I'm thrilled with the Benjamin Moore color (Powell Buff) on the walls...a creamy gold that really brightens up the room.

BEFORE

This is what I had going on before....we lost the rug last year because the cats liked to use it
as a scratching post ugh..so out that went...I still mourn its loss.  And I love red but I'm over it and I needed new art for my walls...in this picture I had removed most of the art I had up.  And a new chandelier will be the final touch, something larger and more French Country feeling.


AFTER
And here she is after the re-do!

The dining room is dressed for Thanksgiving...I'm hosting it this year.
Its not my favorite holiday I will say but I enjoy the time off with my family.
My dining room furniture was an anniversary gift over 14 years ago from my husband...its from Ethan Allen and something I will never get rid of....I love the honey color and distressed feel to each piece.


I have lanterns from Kirklands, candles, pumpkins and a wheelbarrow I got in Lucketts at the Design House.  This middle arrangement will come off for dinner of course.  And soon it will be decked out with Christmas decorations.


My curtains used to hang to the floor and they were lovely.  However they collected more cat hair than my vacuum cleaner and were a pain in the bum.  And I just wanted a fresher, lighter look for the windows.  The mirrors on either side of the windows are from Hobby Lobby.  I am in the process of repainting all the white trim in my house...so far I have 3 rooms done..phew..after 7 years it definitely needed the touch up.


I finally got to rehang my Warren Kimble picture...I love his art and we were lucky enough to meet him in his studio years ago up in Vermont.  He signed a few pieces for me and this is one of them...something I will always treasure.  And it goes with the French Country theme nicely I think.


I went for simplicity this Thanksgiving for table settings.  Linen placemats, our silver, mini grapevine wreaths as napkin holders and rustic pumpkins at each place setting.  Those are Waterford water glasses at each setting that James' grandmother got us years ago for Christmas.  They come out every holiday season and we remember her...she got us many of our nice serving pieces each holiday.


The wall with the buffet will soon be stenciled with a 24x24 size stencil in two-shades darker than the paint color now.  It will be subtle and pretty...like a damask print on that one wall to draw interest behind the buffet.  And the pictures I have (4 in total--2 for each side) will go on each side of the buffet. I can't wait to hang those.  I'd love to have a tall hutch at some point but I have too many other "needs & wants" for the house first LOL.


Here they are before and after...big difference no?  I love it!
I will share final pics once the stenciling is done, new pictures hung and new chandelier hung.
Big improvement at least to me :)


This is a Thanksgiving Fall Subway Art I made for my kitchen that I framed.
I haven't grabbed a photo yet yikes...but if anyone would like to use it feel free.
Its sized for 8x10 paper and prints nicely on cream cardstock.
********

Entering this Makeover into the following fun Linky Parties:

36th Avenue
The Fun in Functional
Common Ground
Make It Pretty Monday
Alderberry Hill/Make the Scene Monday
DIY Dreamer


Share:

Wednesday, November 27, 2013

DIY Rustic Holiday Banner!


Happy Day to you all!  So here is Part 3 and the final phase in my Holiday mantel project.  A rustic holiday banner made with canvas, jute and paint...super easy & inexpensive to create!  You can see the other parts of my mantel:  Christmas Mirror HERE and Frosted Glass Holiday Hurricanes HERE.


Here is the entire mantel in all her glory...dressed with some burlap and greens from my yard!
Phase 1 of Holiday Decorating done :)


You can buy banners in many materials ready for you to use at most craft stores...but they are pricey.  Simply measure them if you like the size in the store (like me heehee) and then buy a 1 yard of canvas material yourself (mine was $2.89 for a yard on sale).  Or you could use a canvas drop cloth...many inexpensive ideas for material depending on what you want.  However I did buy the canvas flowers pre-made at Hobby Lobby...they were $2.99 each but on sale 50% off each!

Then you need to decide how many banner flags you will need depending on your saying or holiday word!  I went with BELIEVE because on my mirror project HERE I used "Believe in the Magic of Christmas" and liked the repeat of the word!

Supplies I Used:
Stencil
Sisal twine or Jute
Acrylic Paint in Color of Your Choice
Banner Material
Embellishments
Stencil Brush
Elmers Glue
Hole Punch


Once you've cut your material into your triangles for your banner you are ready to paint them.  I cut letters with my Silhouette Cameo to use as my stencil. I cut one out of inexpensive cardstock first to check the size...then cut them all out of thicker cardstock once I determined the size was correct.  This way my stencil was a tad thicker and better for stenciling in with.  Then I sprayed the back with my handy-dandy Crafters Companion Stick-n-Spray and smoothed the letters on each banner flag to stencil.  I used a stencil brush because its much better at pouncing which is what you want to do...you don't want your paint to bleed under the edges by wiping the brush back & forth. (no no no)


Here are my letters all done and drying...I wanted them really dry before I started handling them. Red paint is highly pigmented no matter what form its in and it can just smudge and spread...yuck.


I used just a regular hole punch to punch holes in each corner of each flag.  You could use a Crop-a-Dile tool if needed but this worked fine for me.  Now canvas likes to fray kind of like burlap so it is best to reinforce your punched holes.  You could use Modge Podge or a fabric non-fray product...but I used Elmers Glue...cheap and easy.  I squirted some on my finger and wiped around the punched holes on both side.  Then let it dry completely before you start stringing the banner.  The canvas flowers are pinned on at the end and I used 3M Command Hooks under my stone mantel to hook the banner on.  Those hooks are A-MAZING..they stick to most things and are super strong...and they come off when you're all done!


And here it is all done up!  I wanted something that might have been done in the 'olden' days around their homes, not anything fussy or fancy.  Not a lot of materials or embellishments used.  Simple yet pretty and so fun!  This is a fun project to do with your kids too if they want to help...mine are teens...they rarely want to help with such things ;)


Hope you enjoyed and are busy doing your own holiday decorating too!
I will be doing that all weekend once I get through Thanksgiving!


Share:

Sunday, November 24, 2013

DIY Frosted Holiday Glass Hurricanes!

Happy Monday everyone!  Hope you had a great and WARM weekend...oooooeeee its cold here in Virginia and windy. I'm of course HATING every minute of it...I so could do the holidays with 70 degree weather, no problem!  But I got a lot done this weekend including finishing up my dining room painting and door painting so I'm pleased about that.  Now to move on to the next project which is stenciling the one large wall in the dining room...sheesh...we're never really done right?


But today I'm sharing part two of my Holiday Mantel that I shared HERE the other day.  I'm sharing with you how I made these beautiful frosted holiday hurricanes.  Not only is it an easy DIY but it didn't cost very much either...a total win win!


Here's the supplies I used:

-2 glass candlesticks from the Dollar Store
-2 glass vases from the Dollar Store
-tube of E6000 adhesive (already had this)
-1 can of Valspar Frosting Spray
-Stencil or Vinyl design
-embellishments to decorate if you wish (from my studio)
TOTAL COST FOR ME:  $10 for both


I used my Silhouette Cameo (my workhorse) to cut a holiday holly-vine out of vinyl--it was called "holly border".
You could use a stencil or something else of your choosing as well.  This was a very delicate cut-out and it was very hard to handle...I won't lie about that fact ohhh noooo.  I had to cut it in pieces to get it to untangle and go on the glass the way I wanted it to (there may have been some cussing on my part, but I'm not tellin'...hahaha).  Any type of small, delicate scrolled design like this cut from vinyl can be harder to handle...so if you can cut it into smaller pieces it does help with handling issues. Or if you have transfer paper I'm told works well too...but I had none of course LOL.  Once I got it on my glass where I wanted I then sprayed the glass (on the outside) 4 times to get the level of "frosting" that I wanted.  In the picture above you can see the design before & after I sprayed the frosting on.  This spray is very easy to use, it never clogged and went on nicely for each coat.  No real waiting time in between coats either.  I just kept turning it around and spraying until I felt it had enough.
I let them dry for about 30 minutes before I pulled off the vinyl though.


I didn't get any pictures of this but THE NEXT STEP is to adhere the glass candlesticks to each of your glass vases.  I use E6000 adhesive because I know its super strong and I've never had issues with it.  However use what you feel comfortable with.  I used the adhesive outside, with gloves and a mask on...because I'm very cautious as always...and added the adhesive to the top ring of my candlesticks. Then adding the vase on top sliding it around until it was centered.  I let them sit in my garage for about 35 mins to cure the glue a bit before I started decorating them.


Then it was time to decorate the hurricanes.  This is an optional step of course but I always think 
a little MORE adds a lil' something extra to your projects...that's coming from a papercrafter ya know ;)
I used burlap ribbon to add a wide swath of material to the center.  Then added some very silky ribbon around that and for a bow.  Then various burlap and paper flowers were added with my favorite Scor-Tape.  So these can be easily slipped off and replaced with a different color scheme down the road if I choose.


And here is what it looks like all finished.  I love how they turned out!
I didn't frost the candlesticks because I liked the two-tones together but that's an option too.


I can't wait to have them lit during December to see the emitting a soft glow on the fireplace.


Here is what the whole mantel looks like in case you missed that post below.
I will have a tutorial on how to make your own holiday banner on the cheap next in
part three of this series :)

Hope you enjoyed & if you make any please let me know so I can see too!!
**********************

I'm entering these into the following Linky Parties:


Share:

Thursday, November 21, 2013

A Two-For You: Aging a Mirror & a Pottery Barn Knock-Off


Today I have a two-fer, fun projects for you!  But I figured I'd put these two posts together as I have many more project posts coming for you all.  I have wanted to make a mirror like this ever since I saw the Pottery Barn's original mirror (which was way above my budget).


This was our family room Christmas tree from last year.
You can see the dark mirror in the picture...it was too brown..ugh!

But first I had to do something about my mirror I have over the fireplace. I've had it a long time and I love it but it just blended into the stone fireplace too much...didn't pop.  So I decided to fix that in time for the holidays.


So I pulled out my can of Annie Sloan chalk paint in "Old White" and her Dark Wax to fix this mirror up right.  Time for the ole' girl to get herself a makeover :)


I put some of the paint in a paper cup and added a bit of water to water it down some...I wanted it to be thinner since I was dry brushing the paint on.  I didn't want the paint to cover up 100% of my mirror..I like those dark crevices against the white.


Then it was time to tone it down a bit.  I took a rag and the Annie Sloan Dark Wax and started to rub it on.  You can see the difference between the waxed part (on the lower section) and the unwaxed section.  It toned it down nicely but still gave it a brighter, fresher and lighter tone which is what I wanted.  It took me all about 20 mins to age this mirror...the chalk paint dries quickly which is a bonus.  I'm so happy with the way it looks now. 


The paint and wax really made the beautiful details of the mirror just pop!  I so love that!


**********************


I had seen some knock-offs done online and of course the original PB Mirror here!
But I had to make my own version...a lil' different verse of course!  And my mirror glass isn't aged like their's is but that's ok...you can do this on any glass surface.
And since I had already done a "Believe" ornament and will show you the "Believe" banner I made...I went with "Belive in the Magic of Christmas" which appropriate in my house.  I say that to my kids all the time every season.


I cut the verse out on my Silhouette Cameo and added some swirls on each side of the "in the".
I chose to do some words in cream and then red to really stand out on the mirror.  Instead of using vinyl which would have been just as easy...I went with cardstock only because I wanted to age the letters with ink (Distress Ink by Tim Holtz).


I cut a piece of wax paper the same length as my mirror so I could arrange my letters on it to see how I wanted to space it.
Then I sprayed the backside of each cutout with my Crafters Companion Stick-n-Spray...I love it so much.  Make sure you shake it every time so that when it sprays the white fiber-like flecks come out.
It easily comes off your mirror with some Windex so this is not a permanent fixture...you can remove it any time easily.


So this is what you get!  I could have made the letters larger but I like the size..it doesn't dominate the whole mirror.  That's my Holiday Garden Elf on the top of the mirror watching down on things...I got him in Savannah and he has a watering can as his hat :)


A few of the other things I've been working on that I will blog about over the next few days:
the banner, glass hurricanes and candle wraps.


I gathered some greens from the trees around my house...it already smells a bit like
Christmas in here...mmmmm!


Here is what it looks like right now...we get a TON of light in the family room so I apologize for the brightness.  The chair on the left will be removed for our real Christmas tree which we will get after Thanksgiving.  Last year our tree was over 13 ft tall...I would prefer 10-11 feet instead LOL as its a tad easier for me to decorate and string lights on.


So that's all there was to it!  One part of the house is finished for the holidays...now onto the 300 others LOL!  Next are the dining room and living room trees. Phew!

Stop back by to see how to create a banner and etched glass hurricanes on the cheap this weekend!


************************

I'm entering this into the following Linky Parties:


Share:
Blogger Template Created by pipdig