life is always about the journey...

Monday, October 20, 2014

Look Ma, NO Electricity......

Happy, Happy Monday Y'all!  

I'm headed to my mom's for the day to see my Aunt who is in town.  I haven't seen her in almost 10 years and she's my favorite Aunt...soooo I'm taking the day off to visit!  I will share Pumpkin Patch pictures with you all this week along with a fun project I finally finished up!

***********************

I had to share this with you all in case you haven't yet seen or heard about them.  I thought it was such a cool invention with so many uses, that I couldn't not share it on the blog.

It's called the Wonderbag....and you can get your own at Amazon.com!
Why is it so cool?

Its basically like a crock pot but without the electricity.  It cooks & keeps foods warm for up to 12 hours.  
And best part is...if you buy one, they donate one to someone in need in Africa.

So if you are like me and afraid to leave your crockpot plugged in while you are gone this is a great solution.
Or if you like to camp and RV...boil your food in your pot and place in Wonderbag to cook while you enjoy the day doing other things.
Use it to take to dinners and BBQs to keep your food warm...or on a buffet when you don't want to or can't plug anything in.
Like to Tailgate? This is great for keeping the food warm while heading to your game so its ready before kick-off!
Or you may just like to save electricity and help out Mother Earth

INGENIOUS!!

It comes in 3 color/pattern options I believe...red, blue and yellow.

"One Wonderbag per year saves 1.7 trees, 1000 liters of water, and 1,248 hours not spent collecting firewood."

And I love that one is donated to a family in need in Africa for every one bought here in the US.

Get Your Own Wonderbag HERE!


Share:

Friday, September 12, 2014

A Touch of Gold


I saw these fabulous jewelry boxes on the web earlier this year at House of Earnest and knew they'd make great high school graduation presents for my daughter's BFFs.  Classy & elegant with gold accents look beautiful on anyone's dresser or nightstand.  I added monograms and polka-dots to mine to make them a bit different.


These are very inexpensive to make and you can customize each one, so they make great Christmas presents for the upcoming holiday season.  I'm actually making one for myself just to keep on my living room table as a pretty accent.


I wanted to add more gold detail other than just lining the top & bottom frames...so I added freehanded gold polka dots just along the bottom of the jewelry box. 


Supplies I Used:

I think the total for my supplies for 2 boxes was under $16...that's with a coupon at Michaels on frames and non-skid pads.  I had the paint pen and vinyl already.

acrylic box frames (I used 5x7) from Michaels
Gold Paint Pen (or any color you choose)
small gold hinges with screws
clear vinyl stick-on non-skid pads
drill & bit
vinyl in any color


I used gold vinyl cut with my Cameo and monograms from the Silhouette store to add to the front of each.  I went with a simple one letter monogram with swirls on each side...I liked the look of them.  And the oval around the monogram was done using an oval metal die that I traced around with my gold pen.

**A little tip....while you are drilling cover the frames with tissue paper just to protect them from getting scratched.  Tape it on with some painters or stencil tape and then drill. And use the painters tape to line up where you want your hinges & screws like in the tutorial, it will help**


You could of course buy a pre-made vinyl monogram if you don't have access to a cutting machine like the Cameo.  You can find lots of them for sale on Etsy for under $5 a piece in many colors and fonts.


Along with the jewelry boxes each girl got a pair of Kate Spade signature bow earrings in different colors...a gift that will carry them through college and beyond. Stylish, elegant and classy just like the girls :)

EDITED:  about the screws...I found clear caps at Home Depot that fit over the ends nicely...the screws don't cut well because they are shorter.  If these will be purely decorative and not opened much you could attach hinges with a glue like E6000.  When I post Alexa's you will see a very different take on these with NO screws...so stay tuned.


So pretty and easy to make....if you want larger ones you could go with a larger sized frame too.
And use different paint pens to make colored versions...I'm making a colored one now that I will share later too that's a bit different from these.


I love how the gold catches the light....definitely will be making one for myself soon!


Share:

Tuesday, September 2, 2014

Collage It!


Finally...I get a chance to post about something I love to use for all kinds of fun projects.  
Easy to use and fun too!  And they make awesome gifts!

It is called Tagxedo... it free for most basic uses and you can customize to your heart's desire!  So much fun to play with.  


This is one of the pictures I made Alexa for her dorm, printed it and then framed it in these awesome white frames from Michaels (buy-one-get-one-free).  She's of course studying marine biology so a dolphin was appropriate!
You can fill the shapes with words that are important to the subject matter or person.  On this one I used words that were specific to Marine Biology, the ocean and our favorite beach vacations. Great way to personalize them!  Make great gifts!


Here is one I made for fall using a leaf shape...filled with fun Autumnal words.
You can save your creations in different sizes & formats....I save mine then edit out the frame on Photoshop so the shape is all that prints.  On this one I set the font to be put in "ANY" way, not horizontally or vertically..just a different look.


A cute one for a baby or kid's room.  In the "THEMES" section you can pick groupings of colors to use...select one that fits best or to your liking.


You can also change the background colors if you don't want white...makes the words stand out in a unique way.  When I type my words I type some in all CAPS, some upper & some lower, etc to give the words a different look.  You can chose how many times you want words repeated, which ones you want LARGE, which words you want only once, etc.  That is done in the WORD/LAYOUT & then click the WORD tab. You can also choose if you want more than one font used too.


I made this one for Riley's room (haven't framed it yet)...I found a free clip art image online and loaded it.  Then filled it with baseball words that meant something to our family...in our case the Washington Nationals.  And then I changed the font and colors accordingly.


I made these back in February for fun, inexpensive Valentine's Day art...again in my favorite white frames ;)  So many things you can do:  create pictures for crafting, scrapbooking, print on stickers/labels/tattoo paper, print on vinyl and cut out....all kinds of things!

*************************

I'm not doing a full tutorial but I have some tips & tricks I've learned below for you all.

*Get started by clicking on CREATE!

*If you use your own or online/free clip art make sure it is SOLID colored. An outline will not work correctly. I type in Google the shape I'm looking for but also add silhouette clip art to the end...that way you get solid images.  Under SHAPE click at bottom to load your image or use one of their stock images.

*To load your words/phrases type them up in your fave word processing and then copy them. I type them paragraph style...any way is fine as long as you space your words.
Click the LOAD button and paste your words in the text box & then click SUBMIT.

*In the "HISTORY" tab you can pull up past shapes that you created in case you want to revisit something you played around with.  So try changing all different elements and then hit history to go back to a previous version. Don't be afraid to try all the different settings!

*Play around with the FONTS to see which is best for your shape!

*In the "ORIENTATION" tab you can change how you want the text presented...its fun to try different versions.

*Word/Layout is fun to mess around with to see different versions of your creations. Brighten colors, blur lines, change how your words look, etc. Experiment with it a bit to see what you can do.

*When you save your image, make sure to name it and save it to your files/photos on your laptop/pc.

*After saving your image you can load it to social media sites or have items made (cups, totes, etc) if you'd like.


Have fun & if you create something show me a picture ok?  I'd love to see what you do!

*****************

Joining in with these fabulous LINKY PARTIES:

Hit Me With Your Best Shot/ Just A Girl & Her Blog

Savvy Southern Style

A Bouquet of Talent


Share:

Friday, May 9, 2014

Gift Giving!


The Gift Giver


I love shopping for unique gifts for friends and family.  There are so many amazing artists and crafters out there and on Etsy that it is a must-stop for me when I have gifts to buy.  I want people to know I put thought into their gifts and spent the time choosing it just for them.  Of course gift cards work well for lots of occasions too (hehehe) but I prefer to add something special in with a gift card too.  Whether you buy it or make it....its all good!

So I thought every other week I'd share some fabulous Etsy or Web finds that I loved or purchased with you all in case you need/want some ideas as well!  And being a fellow artist, crafter & DIYer I always love to support other companies and artists that have items that are handmade too!


I absolutely ADORE all the gorgeous items at Senay Studio. I've shared items from this store before (gorgeous hand painted pillows). I love that they now have beautiful floral phone cases as well...they are stunning and perfect for anyone that loves flowers & watercolors.  They come in sizes for iPhones and Samsung Galaxy phones and iPads.


I bought quite a few of these for Christmas gifts this year from QueenBee Trading Co.  I LOVE Lotion Bars...little different from squeezable lotion.  You take the bar and hold it in your hand for a few secs to warm it, then rub your hands with it all over, place back in the tin and rub your hands together.  They smell good, they are all natural and they leave your hands silky smooth...not greasy!  And at $5 a tin they make great add-on gifts too!  They'd be perfect to add to a gardening kit for your favorite gardener.


These grilling planks are perfect for the grill-man (or woman) in your life...great gift for Father's Day!
I like this sampler pack for $24.99 a lot which includes all 6 flavors of wood planks to try out (Cedar, Alder, Maple, Hickory. Red Oak and Cherry). 
For each plank flavor they have food pairings that work well with each & you can send them a message and they will share recipes with you as well.  Made from sustainable wood sources and all natural...can't beat that.  I'm thinking they will be great for both my hubby and dad for Father's Day Gifts.


Felix Street Studio
Handmade leather toiletry bags that are personalized with a monogram are perfect for ANY man in your life. I love that they are handmade and come in so many different colors.  My hubs has had one I bought him when we were first married and he STILL uses it 19 years later...good quality lasts. So these run $75 but they are something the recipient will have for a long time.  Amp the gift up by putting in some great men's products like those by The Art of Shaving 4 Elements Starter Kit (my husband's fave)!


And I love these simple but elegant mini vases crafted by hand from Wapa!  Just beautiful alone or grouped together with some fresh blooms of summer in them.  The one at the very top is my personal favorite...love the embossed pattern!


And you can never go wrong with jewelry...especially earrings an bracelets.  I love anything that has sea glass in it...reminds me of my favorite place to be near the ocean.  I like the delicate look of these earrings from Biker Bling Cand of course the beautiful colors of the sea in the glass.


Those earrings would be beautiful paired up with this sea glass bracelet from
Bellina Creations!  Gorgeous!


That's the best thing about Etsy too, you can shop from so many artists all at once....so head on over & load your cart up!!  Or "favorite" shops and items you love by clicking on the hearts so they are easy to find when you are ready to buy!


Share:

Friday, February 14, 2014

Happy Cupid Day!!

Hope you are having an enjoyable Valentine's Day!
I'm not a huge fan of the holiday...only because I think that while grand romantic gestures are nice...I prefer the smaller day to day things to show you love someone or that someone loves you.

For me those things include my hubby bringing me home my favorite donut on Sundays, helping clean the house on occasion, help me groom the dogs, let me sleep in, picks up take-out when I'm running behind during the day, gives great back rubs, picks up groceries, runs downstairs at night to get me a chocolate milk while I'm reading, doesn't give me grief over how much money I spend on Kindle books, makes sure my car is gassed up and warm during the winter and more. All those things are so much more important than candy & flowers...although they are pretty and the gesture is lovely I'd prefer to wait for something more meaningful.  But that's just me......


I have always gotten the kids and my husband gifts from Cupid.  When the kids were smaller that meant heart shaped sandwiches and pancakes, dipped strawberries and special cupcakes or cookies.  And of course some small gifts and a book.  Now that they are teens they still get the Cupid gifts but not the heart shaped food LOL!

I like to pack them up and display them with some of my Valentine Decor for them to discover!  This year I found the cute take-out boxes at Michaels and thought they'd be awesome for their sweet treats!


I always make some kind of Valentine for both of them....last year I made them these "Crush on You" valentines you can see HERE.  This year I found these free printables on Pinterest and knew they'd be cute on some Blow Pops and Tootsie Pops!  I just printed them on cardstock and cut them out, then cut two slits to slide the blow pops in.  I'm guessing next year I will be sending a box of goodies to Alexa at college...sniff sniff.


Due to some things going on right now I haven't had a chance to post how I made these Valentine pictures.  But I will have the post up next week with Easter ones and some that I made for my daughter's room.  So stay tuned for those instructions :)  The little milk bottles are from the Target Dollar Spot...I added the "Be Mine" with vinyl cut with my Cameo.

Super fun to make!


One of my daughter's gifts was a leather wrap bracelet from Lenny & Eva!  I'm obsessed with them and have ummm....a few different ones myself LOL!  I knew she wanted one and her fave color is teal/blue and I chose "imagine" because I want her to imagine her future, her dreams coming true, everything good in life I want her to think about!


One of my son's gifts was this T-shirt LOL...he's a big Anchorman fan so I knew he'd love this shirt and he did!!


For my husband he got a custom pillow I had made on Etsy at CoverLove for his study!  I just love it and hope he does too.  I loved the font and vintage feel and it looks great in the study too.  I've ordered some others that I customized and I will share those when they come in.  The gal is wonderful to work with and they make such unique and personal gifts!

I also got him this Swede Paracord survival bracelet...he's big on hiking/camping gear so I thought this would be cool for him to either wear or hook onto his backpack.  It has flint and string to start a fire quickly and an eye knife attached to it. This is the man who can spend 10 hours in REI and who has most everything...but THIS I knew he didn't have ;)  It also comes in lots of colors too!


Alexa and I also made some chocolate dipped strawberries for dessert tonight.  Wegmans had these GIGANTIC strawberries for dipping and what is better than chocolate and fruit right? mmmmmmm 
We did a couple with bowties & buttons with white chocolate just for fun too...easy dessert to make and so pretty!


Happy Valentine's Day My Friends!!!


Share:

Wednesday, August 21, 2013

Laundry Essentials!!


Some Laundry Essentials for College


My daughter is off to college next fall and I am collecting and making gifts for her and her two BFFs to take to college <Read more about that HERE>.  I will put them all in the large Thirty-One totes I got each of them.  My daughter has learned (I say that term loosely ahaha) to do laundry but I am still in charge of laundry in this house...I don't mind but I they are responsible for the put-aways of their clothes/towels/linens.  But I know once she's off to college she will be doing it ALL by herself so I wanted her to have a few essentials that she can take to the laundry room easily. 

PS--I forgot to put the small white scrub brush in the photos but that will be included too.  It was $1 from the Target Dollar spot!


The laundry basket in background is MINE..it is not included ;)


Dish Soap, Vinegar and Honest Co. Stain Remover
are the essentials I've taught her to use for stains and "incidents".
Yes white vinegar and dish soap can pair up to clean some mighty stains my friends.
I created pretty labels for each...no surprise...I am a papercrafter at my core and 
I simply cannot help myself!


A small stack of inexpensive white washcloths to dab and blot at stains are essential
in my laundry room and for Alexa's Kit.  I tied them off with a pretty ribbon to match :)


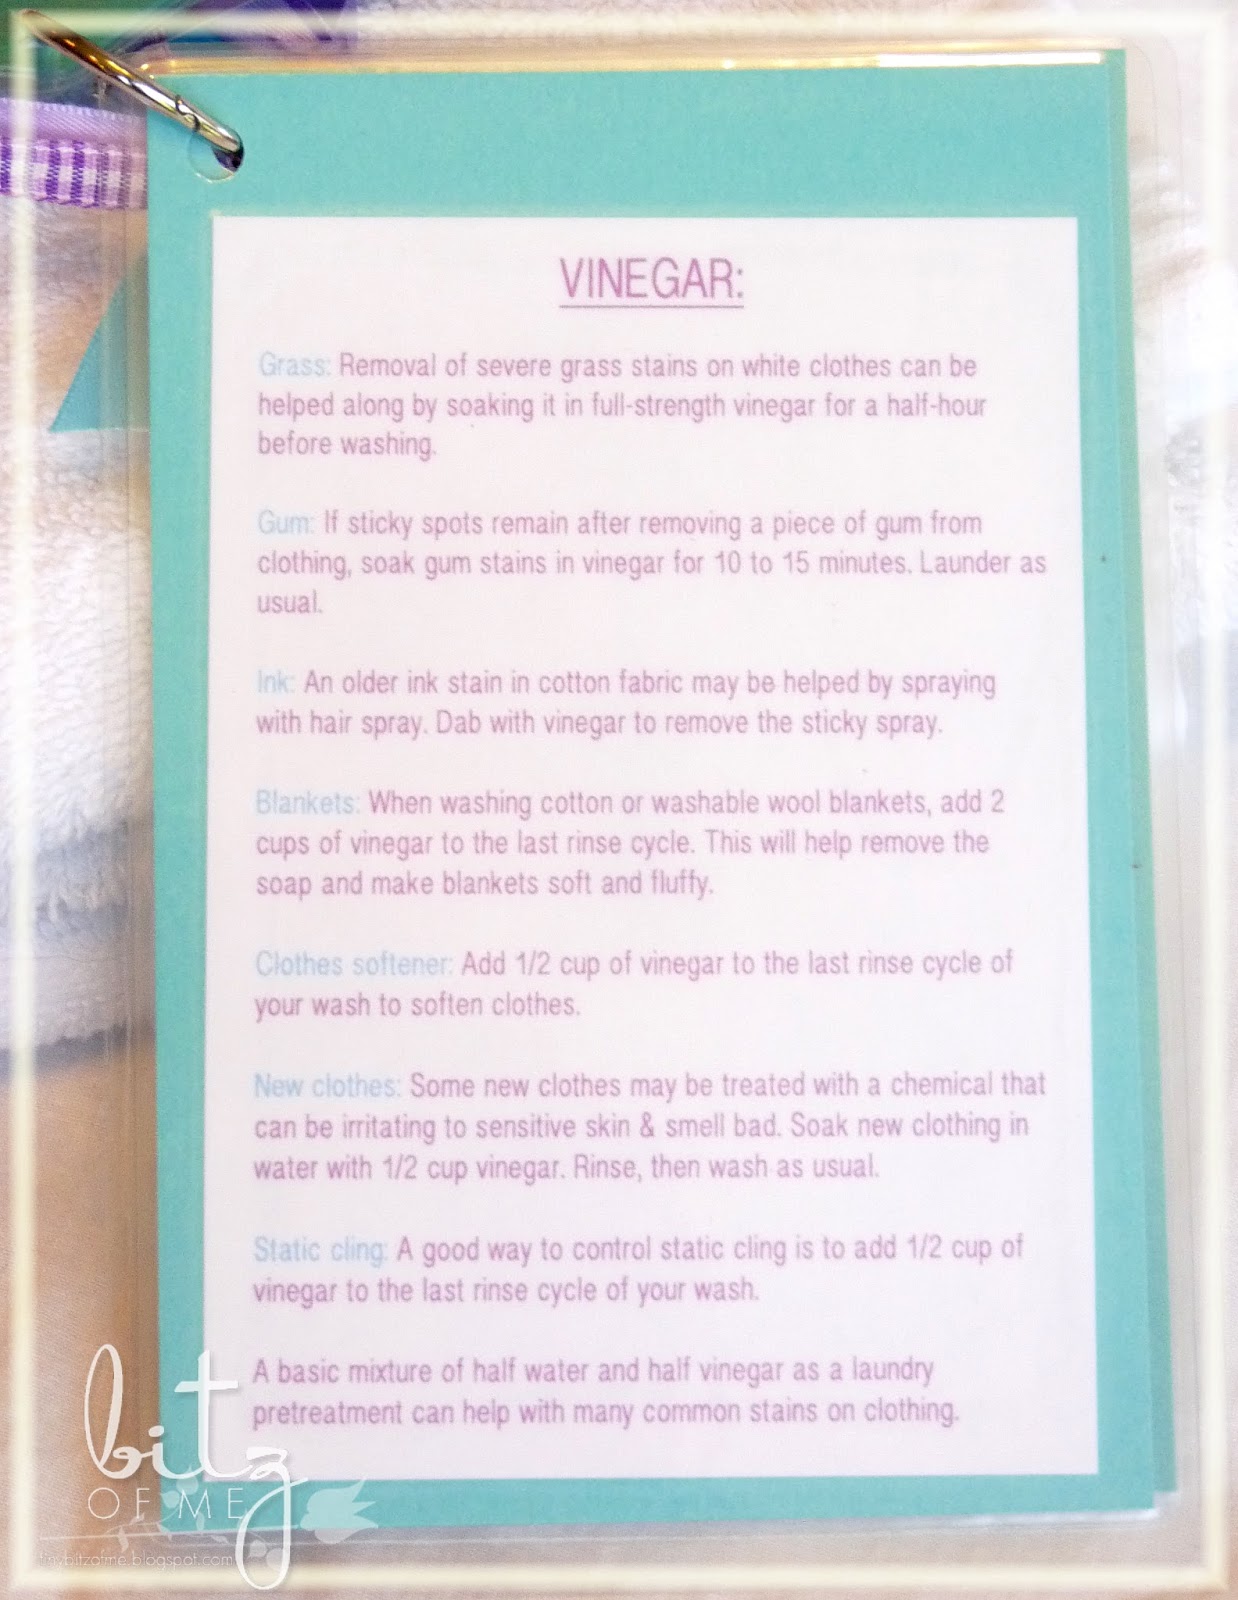
Then momma made her up some Laundry Tip cards...all laminated for the inevitable spills and splashes!
I will link them below for anyone that would like to use them, they are in pretty colors so if you need them for a boy you will need to change text colors :) or ask me to and email them to you if you'd like. They are formatted for a 4x6 card.


I used my printer to create all these tags and then I stamped the teal swirls on each label, then laminated them.  Because I used thick cardstock I sent them through the laminator 3 times...just to be safe..cuz I'm all for safety and longevity ;)  Then hole punched and hooked together.

**I bought a NEW laminator from Target...a Scotch machine for $24 and it worked beautifully.  I had an older Xyron and it broke as I was beginning this project...arghhh*


Laundry tips that I know Alexa may forget or question what she remembered that she either 
attach to her laundry bag easily or keep in the bucket.
At the bottom it reads "WHEN ALL ELSE FAILS USE GOOGLE OR CALL MOM!"
Or in my daughter's case she will probably text me WHILE she's doing laundry LOL!

A tip sheet on how to use white vinegar effectively on stains!


And another Stain Removal Tip Sheet with how to clean off
grease, lipstick, soda, pizza sauce, etc...all those things that may get on
clothes while at college.  And my daughter is the leader in dropping food on herself..so I got it all covered.


This is Alexa's new laundry bag that her grandmother got her to take to college.
Its a Vera Bradley bag and its HUGE, will haul a lot of laundry and has a nice thick strap to carry too.
Inside it has an attached pouch for change but at U of SC (where Alexa hopes to attend) they can use their student ID cards like a swipe card in the laundry room to pay for loads of wash...a little easier to do the task.  Why?  Because when her card is empty of $$$ she simply calls the Bank of Mom & Dad to load it up again LOL!


I made a matching tag to attach to her laundry bag as well just in case.
And cuz' its purrrrtyyyyy :)


 I added some pretty paper to the galvanized bucket (bucket was $3 at Michaels) to match the labels I made and another tag that hooks on the bucket saying "Laundry Essentials".  Just in case you forget ya know! <wink>  And everything fits inside nicely (and the scrub brush which I forgot, arghhh)!

Everything in this bucket including the bucket was approx $18 for all supplies

I will make 2 more of these sets for her friends in their fave colors as well...then they will go in the large tote bags.  So by the time they graduate there will be all kinds of goodies for them to use at college and maybe not feel too homesick.

This is a great idea for a brand new home-owner too...maybe a college grad moving into their first apartment or a young person moving into their first home perhaps.

*******

Here are links to print the files for my Laundry Tip Cards if you'd like to use them.  They are formatted to print in a 4x6 size on an 8.5 x11 size paper.  They will also print in pretty colors ;) 


Laundry Tip Card 3

Masculine Versions here:  Card 1, Card 2, Card 3


*******
Linking this to these link parties:


Happy Wash Day to you!


Share:
Blogger Template Created by pipdig