
Along with the usual hustle and bustle of the holidays, most folks struggle with tight budgets this time of year. And if you have kids you tend to make sure the kids get what they want need first and the rest falls away. So sometimes money for holiday decorations just isn't there, or just not enough for what you may want to accomplish. I love to decorate my home for the holidays but I don't want to spend a lot of money every year. And there's a certain satisfaction that comes with decorating on a budget..when your home looks festive and you know you didn't spend big bucks...I LOVE THAT!
I have 10 Christmas trees and bins of decorations but I didn't just gather them in one year, no way. When we were first married we struggled financially especially when I stopped working to have our daughter and money was tight for a couple of years. So we started with one tree just like everyone else and slowly built our collection. My mom bought me a Christmas ornament every year growing up (just like I do for my kids) so I had a good start when I got married. And I also had ornaments we found at the thrift stores...a box of 12 vintage glass ornaments for $3 that I still have...gorgeous and I love that they have a history. But because money was tight when I added our 2nd tree I came up with ways to decorate both the trees and house inexpensively. A lot of items I made myself and I still continue to make myself as its a great way to customize your decorations and make them special!
So don't feel that you cannot decorate your home beautifully for the holidays on a budget...BECAUSE I'M TELLING YOU THAT YOU CAN!!
And I speak only truths :) Trust me over half of my decorations were made or bought for under $10 if not done for free over the years. I do not discriminate on Christmas decorations...whether its free, from the Dollar or Thrift store, homemade, handed down, or bought. As long as I love it and it works...then its included in my holiday decorations. And don't get caught up in what your home "should" or "could" look like...baby steps people...things of value & admiration take time and effort. If you are willing to put in the effort you can achieve most things I truly believe!
The most money I spend each year is on a few ornaments for the kids for their collection and lights...that's really it. Then I choose one item I really, really want and save for it. This year it was an antique sled that I got for a BARGAIN in Lucketts for only $58...over the years I've seen them go for over $200 so I was real lucky and I ADORE it!
***********
RIBBON
.jpg)

Ribbon on two of my trees above..I usually use two different patterns of ribbons and alternate them on the trees.
You can find ribbon at most craft stores and usually its on sale especially AFTER Christmas when you can get rolls of ribbon for $1 or less. Or use those coupons on rolls of ribbon. Ribbon is a great way to take up space on the tree, add some elegance and personality to your trees. I have ribbon on some trees that I've had for over 12 years. I also have a bin full of different styles of ribbon (bought after holidays on sale for 99 cents a roll for 3-5" ribbon) in case I want to change it up.
*I used ribbon on my family room tree this year that I bought 10 years ago but never used :) Most average size trees you will need 3-5 rolls of ribbon to decorate by wrapping around the tree or have the ribbon falling down from the top.
*When you wrap your ribbon around the tree, don't just wrap it and let it be. Tuck the ribbon in, twist it, and curl it so that it gives visual interest on the tree BUT DOESN'T overwhelm the tree either...you want it to be an accent to the rest of your decorations on the tree.
*Also there are great videos online that show how to create beautiful bows...take the ribbon and make bows and hang them on doorknobs, wreaths, tree toppers, chandeliers and more!
*Wrap pillows with ribbon and bows, set on your furniture or add a few to a rustic basket or crate.
FABRIC

my holiday banner made inexpensively

I use yards of fabric for most of my tree skirts
Yards of fabric purchased on sale or with a coupon is another way to decorate your home inexpensively for the holidays.
*One or two yards and you have a lovely no-sew tree skirt. Just bunch it around the base of your tree and ta-da...its gorgeous.
*For a vintage look rip strips of fabric (so the edges fray) and tie onto tree branches in random spots. *With canvas or drop cloth material you can cut out holiday shapes like angels or stockings and spray with a heavy fabric starch, punch a hole in top, add some ribbon or jute and you have some inexpensive ornaments.
*Fold a yard of fabric in half and use as a runner on your table...sew a simple seam or use fabric tape to finish off the ends of the fabric nicely...or leave raw edges for a rustic look.
*Use fabric along with stamps/stencils and acrylic (or leftover wall paint) to create a holiday banner for your mantel, walls or hutches. See HERE for my holiday banner made inexpensively pictured above.
FLOWERS

Faux & dried blooms and pinecones on some of my Christmas Trees
I love to include both faux and real blooms on my trees, just another way to add interest and texture to your trees.
*I use dried hydrangeas that I clip each year from the bushes around my home and tuck them into the branches of my trees. And of course you could use any dried flowers your might have. Buy faux blooms on sale/coupon at your craft store. Those holiday flowers go on a deep discount after Christmas and great time to pick up a few. After Easter/Spring is another good time to buy floral items from stores. On my white & gold tree I use faux white roses, poinsettia and baby's breath blooms that were all bought on sale & have been used for years.
*Wreath or floral sprays can be expensive but the closer we get to Christmas the deeper the discounts. I use sprays on many of my trees. Another way to add texture & depth to your trees.
*Pinecones look beautiful hung or nestled into tree branches or stacked in bowls or baskets. Flock them, paint them, glitter them for a fun look as well. You can buy bags of them for around $3 at most stores or gather them from the woods for free.
*Same thing goes with branches from trees...easy to gather and FREE! Stick them in the branches of your trees to add some rustic elegance, spray paint them in metallics or colors to add some fun visual interest. You can spray paint them and add them to vases or urns as well...hang small ornaments off the branches or beads...they make great holiday accents for the home. I love to see branches sprayed white with some small silver ornaments hanging off the branches...very elegant for a centerpiece on your tables.
*The Dollar Store is a great resource for inexpensive boxes of metallic or sparkly ornaments in bulk for just a $1 to decorate your branches too!
GREENERY


I love to have greenery in my home...I tuck it into all nooks and crannies, shelves, containers, draping over clocks, mantels and more. I clip it from the trees around my house so its free but it adds SO much...looks festive and smells great. Add some twinkling white lights or colored lights for interest. Don't have any trees around your house? Some home improvement stores have a bin of discarded branches from the trees they sell and they are free. Ask at your local Christmas tree farm or lot if you can have any clippings. Ask a friend or relative if you can give their trees a trim or if they have woods you can tromp around on and gather some greens. Lots of way to find greens without paying a steep price.
PAPER

(my dining room tree with sheet music & burlap)
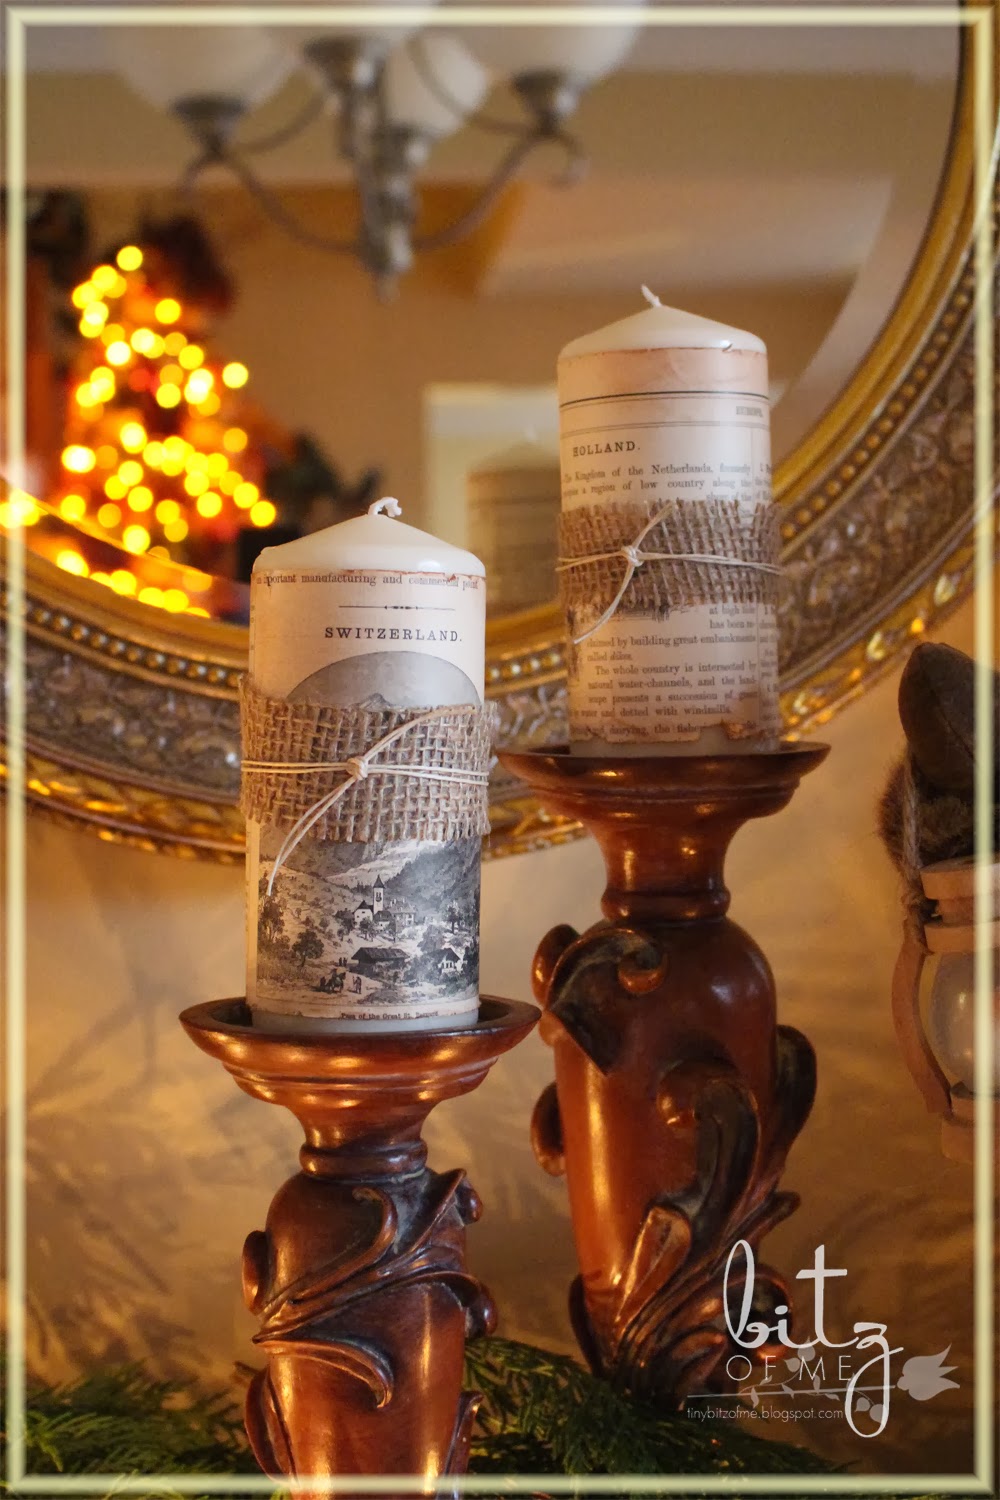
Dollar Store Candles wrapped in old geography paper, burlap & jute
Go old school with paper I say! Its always in and always looks fabulous! Soooo many ways to use paper in your holiday decorating.
*Use inexpensive construction paper or cardstock to create paper chains for your trees or mantels in your favorite colors.
*Wrap inexpensive dollar store candles with old paper or scrapbook paper, ribbon or jute. Mine above were made in under 10 mins with supplies on hand and $1 candles...easy! These candles sell for $10 or more in specialty stores.
*Make paper banners instead of fabric banners and decorate with glitter for more sparkle.
*Cut shapes from cardboard scraps and decoupage with holiday papers (extra wrapping paper, wall paper scraps, magazine pages, book pages). For the price of a bottle of Modge Podge you can make a treeful of decorations.
*I used sheet music curled up and tucked into my dining room tree for some vintage elegance...I got a vintage book of holiday sheet music for $3 off of Etsy and I only used about 10 pages out of the 40 it has.
*Take old Christmas cards and cut out images from them that you like...modge podge them and add a hanger to create fun & unique ornaments. Or display old Christmas cards in inexpensive frames around your home...great way to keep special cards that mean something nearby.
I'm all about sentimentality in your decorating, so much more special that way when you have a memory, person or experience attached to it.
SPICES & FRUIT

Fill your home with the scents of Christmas using herbs & fruits!
*Make some stovetop potpourri to simmer all day...you can make it so inexpensively (see here for a recipe).
*Bundle up cinnamon sticks and tie them with a festive ribbon and hang around the house or on the tree.
*Stick cloves in oranges and lemons, place in a pretty bowl and put on your table. Add a bowl of red apples to your countertop for a punch of color.
*Rosemary trees placed in pretty pots are inexpensive, smell great and look pretty placed in your kitchen.
YOUR COMPUTER

I bought this chalkboard art on Etsy, printed at Staples for $2 & framed it with a frame from the Thrift Store that cost me $2.
If you have a computer and a printer there are endless ways to make some holiday decorations to your home.
*Create subway art or chalkboard art in your photo editing software (use a free one like PicMonkey) and print out and then put in an inexpensive frame. You can buy them off of Etsy already done for under $10 as well if you are not computer savvy....or ask a friend that is :)
*Download free clip art or scrapbook paper and print to use for decorations, decoupage or holiday tags.
*Print patterns/images out and cut with scissors, add ribbon and use as decorations on your trees.
*Print patterns/images out and cut with scissors, add ribbon and use as decorations on your trees.
MASON JARS

Oh the wonders of the mason jars...so many fun ways to use them for the holidays!
*Make mason jar snow globes as seen HERE. If you don't want to add water you don't have to, they still look beautiful!
*Add some ribbon & accents to the top and a candle inside for instant rustic charm.
*Frost or Paint mason jars to use as pretty vases on your tables.
*Make Mason Jar luminaries for mantels, on your stairs or outside...if using inside please use a flameless candle if they can be easily knocked over.
*Fill mason jars with a fun recipe mix, add a festive tag and place around the kitchen or on a pretty tray for hostess gifts or party favors.
*Add water, some cranberries and greenery and float a tea light on top for a beautiful centerpiece (like HERE)
*Fill with festive candies and tie a pretty ribbon around top.
And so many more ideas used with these inexpensive jars! Think outside the box!
FESTIVE OTHERS

Antique silver pieces I collect filled with some greenery set atop old books
Take items you already have and use in your home and give them a holiday REpurpose.
*Add old Christmas books to the table--I buy mine off of Etsy for $4 and under.
*Add greenery or herbs to old silver serving pieces or tea cups...I buy antique pieces locally for $10 and under. Add a tea light to pretty antique tea cups as well and scatter around.
*Take old, antique & vintage tins and add greenery or blooms. Stack them on old books, place them in bathrooms, add to a hutch or just simply on a shelf..I use them everywhere. Old books add a lot to your decorating all year round too.
*Tie bows on door handles or chandeliers.
*Buy inexpensive glass ornaments and pile in bowls or in hurricane vases to add sparkle around the house easily.
*Add a string of white lights to a glass vase or other colored glass object and place on end tables.
*Make luminaries with paper bags, punched with holiday designs and flameless candles/tealights. Use brown bags for rustic, white bags for elegance or colored bags for festive fun.
Both retail stores & thrift stores have great deals after Christmas. Comb your thrift stores after the holidays as well because lots of people end up donating holiday decor items because they no longer use them and don't want to pack them up again.
Both retail stores & thrift stores have great deals after Christmas. Comb your thrift stores after the holidays as well because lots of people end up donating holiday decor items because they no longer use them and don't want to pack them up again.
**********************
So many ways to add holiday beauty to your home whether you are on a budget or not. Think outside of the box, use what you have on hand, go on a walk in the woods and gather items from nature. Get crafty with your kids...even if you aren't crafty you can do a lot with simple items like paper, scissors and glues. Look online, on store websites, in catalogs for ideas that you can recreate inexpensively and easily. Just because someone SELLS it doesn't mean you have to buy it...try and make it. Barter with a crafty friend for something...make her dinner for the use of her Silhouette Cameo...etc.
Most importantly have FUN, don't STRESS, ENJOY it and make the holiday perfect for you and your family!
******
Linking to these fab Linky Parties:
******
Linking to these fab Linky Parties:
Savvy Southern Style
Making Monday #18
Give Me The Goods Monday
Life on Lakeshore Drive
Make It Pretty Monday
DIY Dreamer
Awesome Things Blog Hop
The Scoop
A Bowl Full of Lemons
Do Tell Tuesday
The Fun in Functional
Make It Homebase
Common Ground
My Turn For Us


