life is always about the journey...

Wednesday, October 30, 2013

Apple Mania!


I love apples. Apple foods. Apple smells. Fresh Apples. 
They're all good. mmmmmm.

Apples are in season everywhere right now. The farmers markets here have bushels of them in shiny, pretty colors that just make me happy :)  And fresh is best y'all!

So I thought I'd round up some yummy, gooey, sometimes-healthy, sweet, tart, happy Apple Recipes with everyone today.  Some I've tried and loved and others are ones that I need to try.


*******************************


{Sunday Brunch..mmmm}


{with apple juice}


{so easy & sooooo good}


{calorie bustin..but a must try..mmm}


{I love brie with apples..gonna try this}


{only thing I drink at Starbucks}


{I'll skip the coconut sugar tho}


{I love a good crunchy slaw & want to try this one}


{think I'll wrap them in bacon for extra flavor}

******

Ending on a Sweet & Easy Note


{yesssssssss}


Are you Apple-Satisfied Now?
Mmmmmm I can't wait to make these...now I'm hungry!!


Share:

Monday, October 28, 2013

Beautiful DIY Mercury Glass!


I love Mercury Glass! LOVE! I have a few antique mercury glass ornaments that are REAL mercury glass and so pretty but very delicate..every year I pull them out and get scared of them breaking.  Its gorgeous all year round but especially in the Fall & during the Holidays!

And usually anything mercury glass even faux is fairly expensive so why not make your own on the cheap.  There is NO LIMIT on what you can make!
I first saw someone do this online while blog hopping (she did an old window) and I said "hmmmmm....I wanna try that".  So I refereed to her technique but changed it up a bit along the way to make it work for me. I did trial/test pieces to see how it would work..I highly suggest you do the same.


Here's what you will need:

- 1 can of Krylon Looking Glass Spray
- squirt bottle of 50/50 vinegar & water 
- clear glass objects 
- a sponge you can cut up
- a lint-free cloth
- papertowels
-acrylic paints in Gold
(black & silver optional)

NOTES:  
Use only the Looking Glass/Mirror Spray...metallic silver will not work..trust me.
I only used gold paint on my mercury glass...but you can add extra silver or black if you want to vintage/distress it more. 

Clean your glass pieces well and then dry them and wipe out with a lint-free or tack cloth.
Cut your sponge into smaller pieces for each paint color you choose to use PLUS one piece for the vinegar spray.

BUT WAIT....find an old piece of glass or a cheap glass (Dollar Store) to test this process on before you try it on the things you really want to use.  TRUST ME on this.
The Krylon Looking Glass Spray is very runny so I found I had to LEARN HOW TO SPRAY IT!!
Short, far away, light sprays in the glass on the INSIDE ONLY on each side.  Light coats and you can respray after 1 minute...you will see it drying.  You do NOT want runny lines of paint!


I did 5 coats on each of my pieces...short light sprays each time...drying for 1 minute.
These are my pieces above after 5 coats.  You may want more or less...totally up to you.
(I had seen someone online suggest spraying it on the bottom and rolling it around the glass...I don't recommend that because it dries quickly and you will be left with runny streaks that aren't pretty..I tried it twice that way on cheap glass and it was awful and too hard to do for me.)


After you have enough coats on your glass...let it sit and dry for about 10 mins.
Then spray your 50/50 vinegar water into your glass on the inside lightly and far away.
Don't put the sprayer right into the glass...do it from a distance so you get lil balls of spray
like above.

Let vinegar water sit for about 20 seconds on inside of glass.


Now some tutorials suggested using paper towels to remove the paint...I tried that on my test pieces too.
(IMPORTANT TO DO THIS ON A TEST PIECE or two...I CANNOT SAY THAT ENOUGH)
But because I was working on a smaller object (she had a huge sheet of glass) I found a small piece of sponge to be easier to control and I liked the texture it gave..but its up to you on what you use.  

Spray your sponge piece with just a lil' vinegar/water as well to wet it.

Then holding your glass in one hand, use your sponge to dab at the paint from inside the glass.
Adjust how much you dab off and the direction you use each time for variation in your glass.
After I did a little bit I would check it from the outside to see how it looked as I worked around the inside of the glass.
Its up to you on how much you want to take off...I suggest starting with a LITTLE bit and then you can take off more as you continue on.

LET IT DRY AGAIN 
after you have removed the amount of paint from the inside that you want.
I let mine sit for about 10 minutes.

Antique Mercury Ornaments..you can see the black peekin' thru!

Then you can start dabbing the paint (I used gold only) on the inside of my glass only on the places I removed had removed the Looking glass Paint from.  
USE THIN LIGHT COATS OF PAINT...not globs!!  
After adding each bit I again checked from the outside to make sure it wasn't too much or too little.  
I didn't use the black or silver paints but perhaps next time I will try it...I was skeered and I liked just the gold on mine for now.  But I like how it looks in the above picture.


This is a close up of the piece after I removed some of the Looking Glass paint and added the gold.


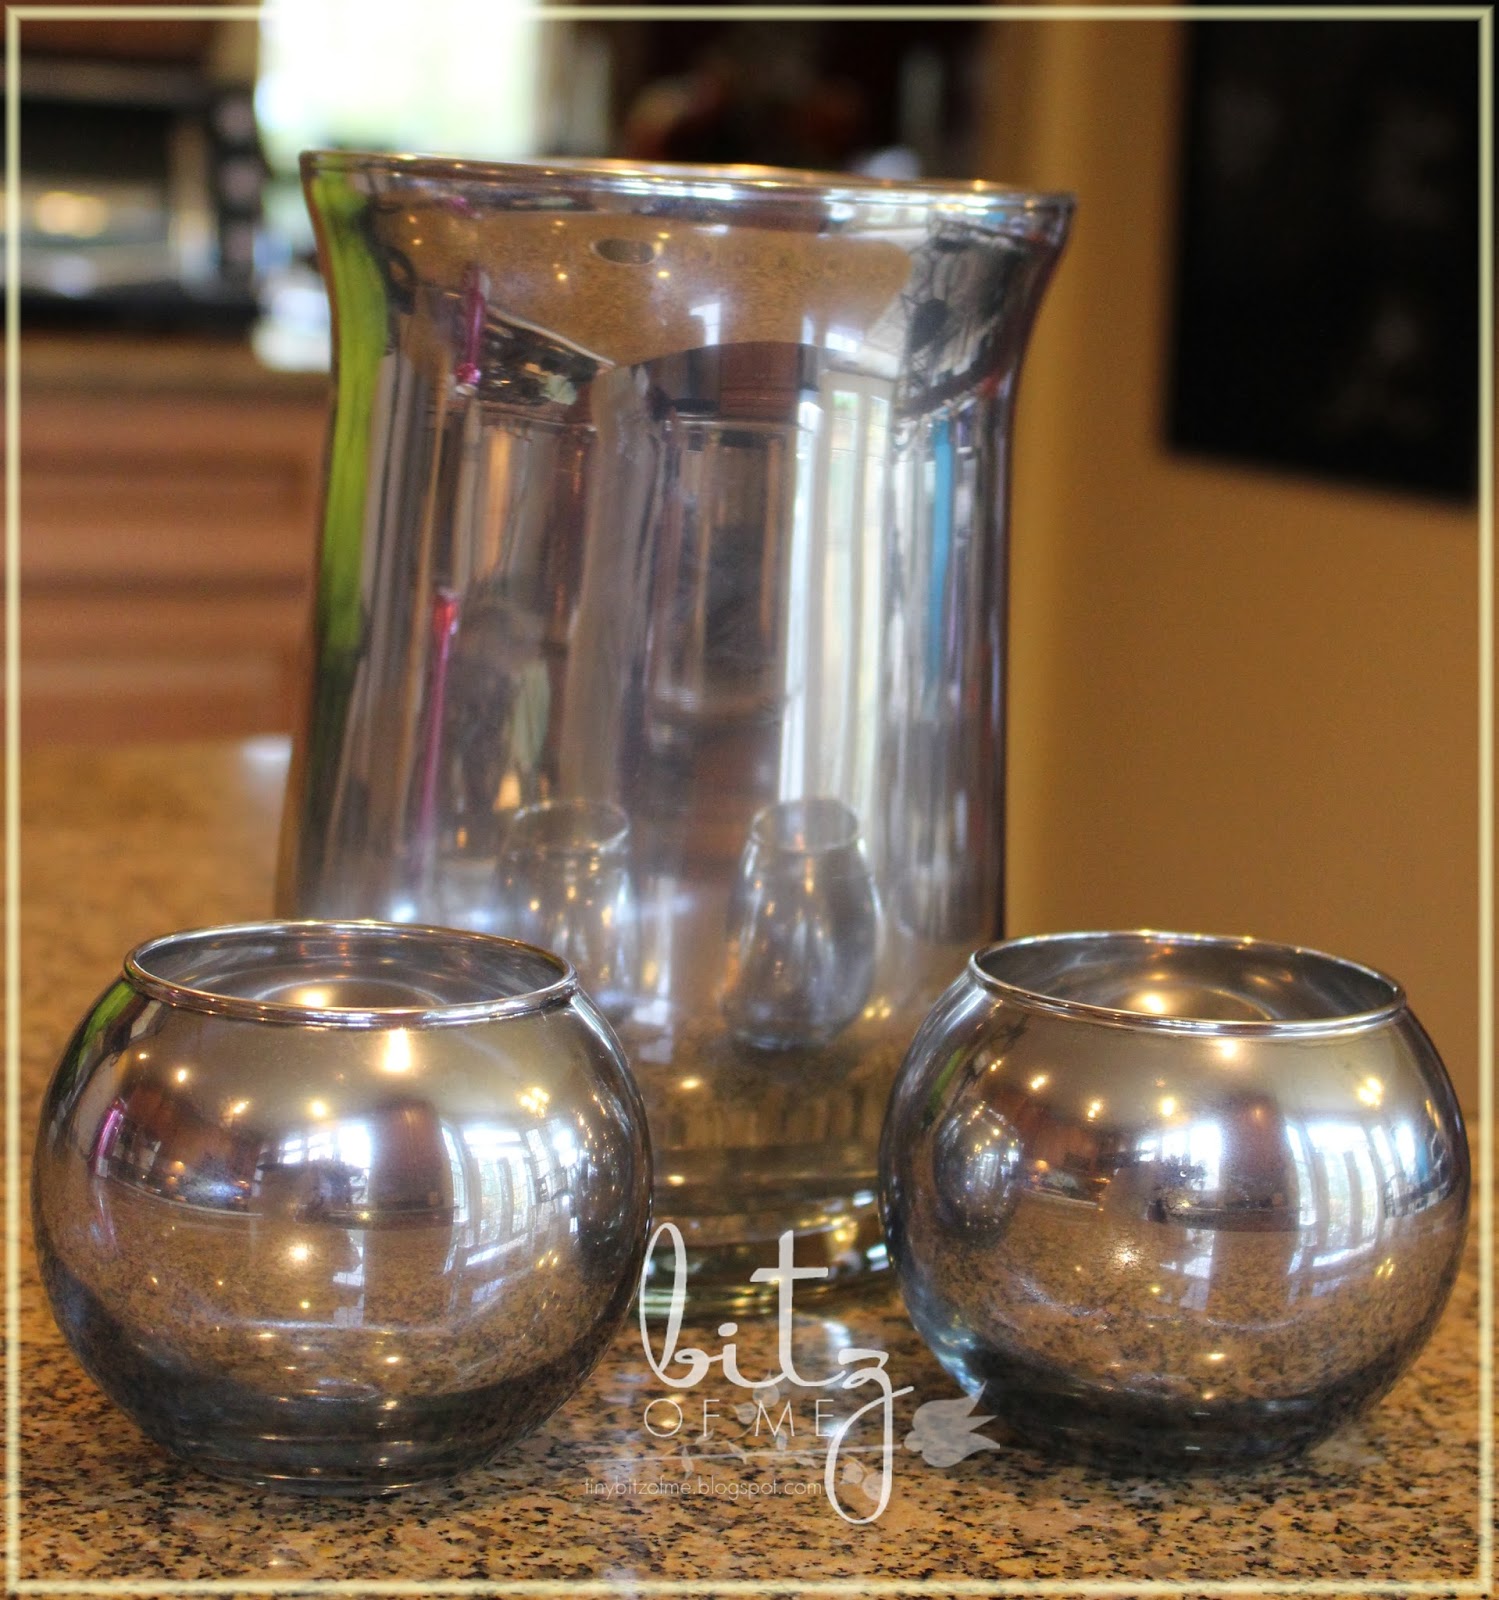
Here they are all done...I am in love with how they turned out!  And it wasn't hard at all once I figured out what process worked best for me.


I am using flameless battery flickering candles in mine. ONE: because I don't want wax melting on the inside after all that work and TWO: I'm not sure if the heat would bubble the paint or make it smell.
I'd rather not push it, if you know what I mean.  Plus these candles are NO WORRY which is great!
(My battery candles are from Hobby Lobby...they were on SALE..and they smell like vanilla)

Cost Breakdown:

$11 $6.60 Looking Glass Spray
(use coupon for 40% off at Hobby Lobby or Craft Stores)
Large Glass Hurricane $4, small votives $1.99 = $4 total
(glassware was 50% off at Hobby Lobby)
Sponge & Rag - FREE
Vinegar Water - FREE
Acrylic Paints - FREE (I had already)
(but usually run $1-2 a bottle)
TOTAL:  $10
You can NOT beat that deal...$10 for these 3 glass pieces...it would cost at LEAST $25 or more in stores!
And I have a lot left in my spray can for more projects..whoo hoo!


And I am ready to use this technique on a lamp and some ornaments I have.
Will share those when I finish those up.
Seriously if you want to try this...do it...it's not hard...just do a trial piece or two first.

If you do make something...come back and share with me...I'd love to see your take on it!!
******

I'm entering this into the following Linky Parties:

That's What {Che} Said - Monday Funday
Domestic Superhero


Share:

Saturday, October 26, 2013

Baring It All!

SHHHHHHHHHHHHHH.....

I have a dirty little secret to share.
I'm so ashamed.
Well not really <ha> but it did bother me and its one of those things that 
NEVER got put on the "list".
My bedside table drawer...look with fingers over your eyes ok?
Everything was just thrown in there...it hurt hubby's eyes to look at it.

Ok Ready?


Thar' she is folks in all her glory!  Old clipped recipes, old lotions, medicines, nail stuff, cords, you name it.
Messy, messy, messy...phew now that I shared my dirty secret
its time to deal with it right?


First things first...empty it out..sort out trash and make new piles.
Then wipe down drawer well and clean everything up.


I got myself some snazzy brown zebra contact paper at Amazon.com...two rolls for a great price.
Y'all KNOW how I love my zebra stuff :)
My Target lacks in good selection of contact paper but Amazon has TONS of cute styles.


Look at that paper in all her glory...BEAUTIMOUS!!!
It makes me giddy :)


And drawer is all sorted, cleaned and unnecessary items removed.
Yes we have a landline phone in the bedroom...everyone should just in case...but more
importantly it is intercommed to 3 other phones on each level of my house.
Ya know...so I can yell at people when I need em ;)
And a pic of me and Alexa when she was little and a Precious Moments the kids bought me
for Mother's Day one year...ya know special things.

What did I keep:
Pens & paper for all my random notes I scribble at night.
Lotions..I hate dry hands & I apply it all the time and I like variety people.
My solitaire game...I like to play some nights when I wake up & can't sleep.
Nail stuff, vaseline for lips and some old notes/bookmarks that my daughter made when she was young.  Granted they should be in a scrapbook but I like to take them out & read them on occasion :)
I only put in 2 small organizers...I actually keep a planner/notebook in this drawer for ideas and blog ideas...but it was downstairs when I took photos. So I needed to leave space for that.

Much better now...we can all breathe a HUGE sigh of relief...heehee.
Well now hubby can...he'd come over and see that mess and sigh & shake his head.
I won't show you HIS garage though...hmmmppppfffffffttttt!


Here is that area in all its glory now.
I am a magazine addict reader and there were 3 stacks about 15 magazines high.
I refused to take a picture..it was that embarrassing.  But I put stickies in my magazines for pages I want pictures of or tear outs so they tend to pile up quickly.
But its all better now too....phew....glad that's done with!


Next up....my bathroom vanity...it was organized but it just didn't work well for me.
So I changed it up and made it pretty along the way.
Stay tuned........


Share:

Monday, October 21, 2013

Need Dinner?


Thought I'd share a few recipes that I'll be making over the next two weeks for my family.
I'm always looking for easy, quick (during week), healthy and yummy food recipes that I can adapt to make my own.  During the week with football practices, teen schedules, my work and hubby's late arrivals or travel it SERIOUSLY works for me to always have a meal plan.  Otherwise I'm scrambling around, trying to defrost something and usually turn to BREAKFAST FOR DINNER.  Which is fine but once a month is about the limit I can get away with that around my house ;)

So every Sunday I make out 5-6 days of meals for the week and get the ingredients on Sunday or Monday at the store.  It makes my life less stressful and easier when I know exactly what I have to do  to have dinner on the table quickly.  

These are a few of my tried-n-true recipes and some new ones that I thought I'd share with you.
If you are like me you are always looking for some NEW yummies to make.
And I promise none of these take super-fancy ingredients or much time at all to make.
(course it will like you DID, so don't tell anyone)

So the recipes below are some of my collected recipes...they are not my own...however
you can find some of my recipes by clicking on the PROJECTS tab at top of blog or looking over
at the sidebar (scroll down) to see the recipes.

Bon Appetit!!


(my go-to recipe)


Teriyaki Chicken
(1 of my all-time faves, I add onions & red pepper flakes to mine as well)


Share:

Sunday, October 20, 2013

Milky It My Way!


Above is the one I made for a dinner party recently...it was VERY popular and yummy!


I apologize for lack of posts...I've not been very well due to pain, meds and ER visits so I haven't gotten much done.  But hang in there with me...I promise I have lots to share and projects to do with you all starting this week!

Starting with this Triple Chocolate Monkey Bread!
Its very yummy...easy to make...and looks great!
It has Milky Way Bites in it...mmmmmm!

It's not my recipe but you can see the great picture tutorial and recipe at Diane's blog HERE!

**my only edit I would make is to add a bit of sugar (sprinkle it) on the dough before you add the milky way bite and roll it.  It needs just a bit more sugar to break up the dough taste IMO, but that's just me LOL ***

Enjoy!


Share:
Blogger Template Created by pipdig